

What Should Happen Before You Start Custom Software Development?
The most expensive custom software mistakes often happen before developers write the first line of code.
A business identifies a problem.
Someone creates a feature list.
A development team provides an estimate.
Development begins.
Then the questions start.
Who can approve this?
What happens when information is missing?
Should customers see this status?
Where does this data come from?
Does this need to sync with the CRM?
Who manages these settings?
Was reporting included?
What happens after the request is submitted?
Each unanswered question becomes a development decision.
And every development decision made too late can create:
- Rework
- Scope changes
- Delays
- Additional cost
- Confusing workflows
- Features users do not need
That is why custom software development should not begin with coding.
It should begin with enough product and workflow clarity to understand:
Who is using the software, what problem it solves, how the workflow should operate, and what the first version needs to prove.
The goal is not to eliminate every unknown before development.
That is unrealistic.
The goal is to resolve the expensive unknowns before they become expensive code.
The Biggest Mistake: Treating a Feature List Like a Software Plan
Many custom software projects begin with a list like:
- Login
- Dashboard
- Customers
- Orders
- Reports
- Notifications
- Admin panel
- Mobile app
- AI
That is not a software plan.
It is a list of nouns.
It tells the development team very little about how the system actually needs to operate.
Take something as simple as:
Approvals
That immediately creates questions:
- What is being approved?
- Who submits it?
- Who approves it?
- Can there be multiple approvers?
- What happens after approval?
- Can it be rejected?
- Can it be resubmitted?
- What notifications are sent?
- What does the customer see?
- Is an audit history required
The workflow is the requirement.
The feature name is only the starting point.
Before Development, Define the Business Problem
A custom software project should begin with a clear business problem.
Not:
“We need a new system.”
But something more specific.
For example:
- Employees spend too much time moving data between systems.
- Customers repeatedly ask for order status.
- Vendor documents are managed through email and spreadsheets.
- Our old software cannot support new workflows.
- Management cannot see operational performance without manual reporting.
- Our current SaaS tools require too many workarounds.
- We need to turn an internal workflow into a SaaS product.
A strong project should be able to answer:
What will become better if this software succeeds?
Possible outcomes may include:
- Faster processing
- Less manual entry
- Fewer errors
- Better customer visibility
- Faster approvals
- Better reporting
- Reduced support workload
- Improved compliance
- Increased capacity without proportional headcount
Without a clear problem, software scope tends to expand because there is no strong basis for saying
Step 1: Identify the Users
A custom vendor portal becomes worth considering when several of these problems happen repeatedly.
Vendors Regularly Email Documents
This is one of the clearest signals.
Documents may include:
- Insurance certificates
- W-9 forms
- Licenses
- Contracts
- Safety documentation
- Certifications
- Compliance forms
- Product documents
- Invoices
When these arrive through email, someone must decide:
- Where to save them
- Who reviews them
- Whether they are complete
- Whether they are current
- What happens next
A portal can move that workflow into a structured system.
Step 2: Understand the Current Process
Before designing the future system, understand what happens today.
This should include both formal and informal processes.
For example:
The official process may say:
Customer request → Employee review → Approval → Completion
But the actual process may be:
Customer emails request.
↓
Employee asks for missing information.
↓
Request is entered into spreadsheet.
↓
Manager approves through email.
↓
Employee creates record in another system.
↓
Customer asks for status.
↓
Employee sends update manually.
That is the real workflow.
Custom software planning should document:
- Who does the work
- What systems they use
- What spreadsheets exist
- What emails are sent
- Where approvals happen
- Where data gets duplicated
- Where people wait
- Where errors occur
- Where customers get frustrated
If the current workflow is not understood, the new software may simply reproduce the same problems with a better interface.
Step 3: Identify What Is Actually Broken
Do not assume every part of the process needs replacement.
Some parts may work well.
Separate the workflow into:
Working Well
Keep or preserve where appropriate.
Creating Friction
Improve.
Creating Risk
Prioritize.
No Longer Necessary
Consider eliminating.
For example:
A business may have a reliable ERP but a poor process around customer requests.
The correct solution may not be to replace the ERP.
It may be to build a custom portal and workflow layer around it.
That distinction can dramatically reduce project cost and risk.
Step 4: Map the Future Workflow
Once the current process is understood, define how the software should improve it.
For example:
Current
Customer emails request.
↓
Employee enters data manually.
↓
Manager approves through email.
↓
Employee updates spreadsheet.
↓
Customer asks for status.
Future
Customer submits structured request.
↓
System validates required information.
↓
Request routes automatically.
↓
Manager approves in system.
↓
Status updates automatically.
↓
Customer can see progress.
That future-state workflow becomes the foundation for:
- Screens
- Roles
- Data
- Notifications
- Reports
- Integrations
Software should follow the workflow.
Not the other way around.
Step 5: Define User Roles and Permissions
Permissions should not be added at the end of development.
They influence the architecture and user experience from the beginning.
Define:
- What each user can see
- What each user can create
- What each user can edit
- What each user can approve
- What each user can delete
- What each user can report on
For example:
Customer User
Can:
- View own account
- Submit requests
- Upload documents
Cannot:
- See internal notes
- See other customers
Manager
Can:
- View assigned department
- Approve requests
- Review reports
Administrator
Can:
- Manage users
- Manage configuration
- View all data
Permissions become significantly more complex when access depends on:
- Location
- Department
- Region
- Customer account
- Project
- Role
Those rules should be known before development begins.
Step 6: Define the Core Workflow
These terms overlap but are not identical.
Vendor management software may focus primarily on internal vendor records, performance, procurement, or compliance.
A vendor portal focuses more directly on the interaction between the business and the vendor.
The portal may become the vendor-facing component of a broader vendor-management process.
For example:
Vendor portal
- Vendor submits information
- Vendor uploads insurance
- Vendor sees missing requirements
Internal vendor management
- Employee reviews documents
- Compliance approves vendor
- Management reports on readiness
The two should ideally support the same workflow.
Step 6: Define the Core Workflow
Every custom application should have a primary workflow.
Examples include:
Request Management
Submit → Review → Assign → Complete
Vendor Onboarding
Invite → Submit Documents → Review → Approve
Order Workflow
Create Order → Review → Fulfill → Ship
Approval Workflow
Submit → Review → Approve → Execute
SaaS Product
Sign Up → Configure → Complete Core Action → Receive Value
If the development team cannot clearly describe the main workflow, the project is not ready to be scoped accurately.
Step 7: Identify Business Rules and Exceptions
The normal workflow is only part of the requirement.
Real businesses have exceptions.
For example:
- Orders above a certain amount require additional approval.
- Certain customers have different pricing.
- Some documents expire.
- Different locations require different workflows.
- Managers can override specific rules.
- Certain users need restricted data access.
These rules often create much of the application’s real complexity.
Ask users:
What happens when the normal process does not apply?
That question often reveals more than reviewing the standard workflow.
Step 8: Identify the Data the Application Needs
Every workflow depends on data.
Define:
- What information needs to be captured
- Where it comes from
- Who owns it
- Who can change it
- Where it should ultimately live
For example:
Customer information may come from CRM.
Order data may come from ERP.
Invoice status may come from accounting.
Documents may live in the custom application.
The custom system does not need to become the owner of every piece of data.
It needs to know where the source of truth is.
Step 9: Identify Integrations Early
Integrations should not be an afterthought.
Potential systems may include:
- CRM
- ERP
- Accounting
- Ecommerce
- Payment systems
- Shipping
- Document storage
- Marketing platforms
- Legacy applications
- Third-party APIs
For each integration, clarify:
- What information moves?
- Which direction does it move?
- How often?
- Which system owns the data?
- What happens when synchronization fails?
- Does the external system provide a usable API?
Integration complexity can materially affect:
- Architecture
- Cost
- Timeline
Investigate it before final scope.
Step 10: Decide What Reporting Is Actually Needed
“We need dashboards and reporting” is not enough.
Define:
- Who needs reports?
- What decisions are they making?
- What metrics matter?
- How frequently do they need them?
- What filters are required?
- Do they need exports?
For example:
An operations manager may need:
- Open requests
- Average processing time
- Overdue items
Leadership may need:
- Volume trends
- Performance by department
- Bottlenecks
Reporting should begin with decisions, not charts.
Step 11: Define What Version One Needs to Prove
This is one of the most important decisions before development.
Do not ask what the software should eventually do. Ask what the first usable version needs to prove, such as fewer status emails, faster approvals, or one workflow that runs end to end without spreadsheets.
Then keep two lists: what version one needs to make the core workflow usable, and what can wait. Some steps can stay manual at first, so the team learns how the process behaves before automating it.
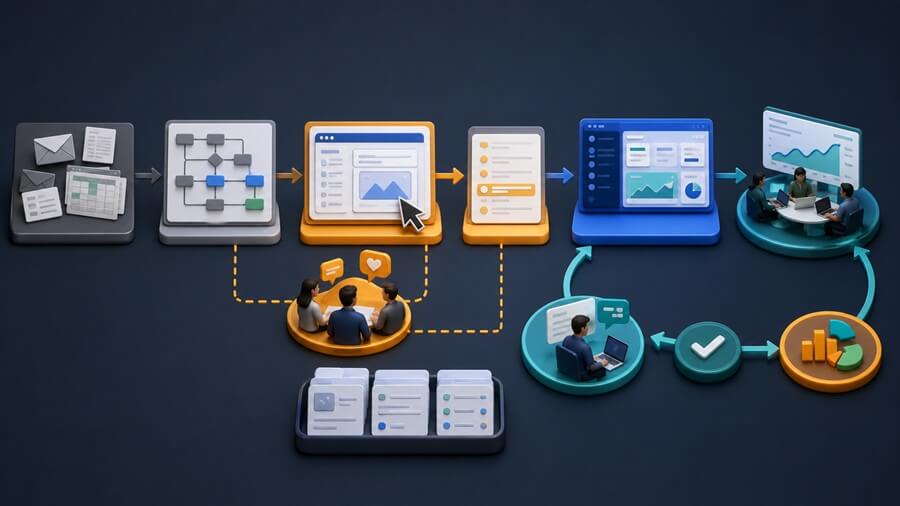
Step 12: Prototype the Workflow and Test It With Real Users
Once the workflow and version-one scope are clear, turn them into clickable screens before any code is written.
Then ask the people who do the work, not only executives, to complete a realistic scenario, such as submitting a new request, without being told where to click. Their hesitation shows missing steps, unclear labels and workflow gaps while they are still cheap to fix.
Our guide to prototype-first custom software development explains this step in detail.
Step 13: Define Success Metrics
Before development begins, define how you will know whether the application worked.
Pick two or three measures, such as hours spent on follow-up, approval turnaround time, or the number of status requests.
These metrics should connect directly to the original business problem.
Otherwise, success becomes:
“We launched the software.”
Launch is an event.
Business improvement is the objective.
Step 14: Define the Technical Foundation
Once the product workflow is clearer, architecture decisions become easier.
That includes where the application will be hosted, how data is stored and backed up, and how it will connect to other systems.
The architecture should be designed for realistic future needs.
Not theoretical scale.
A system for 200 users does not necessarily need infrastructure designed for 20 million users.
Build lean.
Do not build fragile.
Step 15: Identify Security and Compliance Requirements
Security affects architecture.
Do not treat it as final QA.
List early who can see which data, what must be logged, and any industry or customer rules on how data is handled.
These constraints should be known before development begins.
Step 16: Review Existing Data
If the application will replace or connect with existing systems, inspect the data early.
You may discover:
- Duplicate records
- Missing fields
- Invalid values
- Inconsistent naming
- Historical exceptions
Data migration may become a significant workstream.
It should not be discovered two weeks before launch.
Decide:
- What data needs migration
- What can be archived
- What needs cleanup
- What needs transformation
Step 17: Establish a Product Owner
Custom software needs decision ownership.
Someone must be responsible for:
- Prioritization
- Business decisions
- Stakeholder alignment
- Requirements clarification
- Scope decisions
Without a clear product owner, development teams may receive conflicting instructions from:
- Leadership
- Operations
- Sales
- Finance
- IT
The result is delay and scope confusion.
One person does not need to make every decision alone.
But someone needs authority to resolve them.
Step 18: Define How Feedback and Decisions Will Work
Before development, establish:
- Who reviews prototypes
- Who approves workflows
- Who approves designs
- Who reviews sprint demos
- How quickly feedback is expected
- How changes are prioritized
This sounds administrative.
It has a major impact on delivery speed.
A development team can move quickly technically and still lose weeks waiting for decisions.
Step 19: Define the Development Cadence
A custom application should not disappear into a development black box.
A practical delivery model may include:
- One- or two-week sprints
- Prioritized backlog
- Regular working software demonstrations
- Continuous QA
- Stakeholder review
- Release checkpoints
The objective is to create frequent feedback loops.
Build.
Review.
Learn.
Adjust.
That is safer than waiting months for a “final product.”
Step 20: Agree on What Is Not Being Built
This may be as important as documenting the scope.
Create an explicit list of:
Not in Version One
Examples:
- Native mobile app
- Advanced reporting
- AI assistant
- Complex automation
- Additional user roles
- Secondary integrations
This helps prevent future conversations like:
“We assumed that was included.”
Clarity on exclusions reduces scope conflict.
Excluded does not mean rejected. A short phased roadmap shows which features come later, so leaving them out of version one is a sequencing decision, not a refusal
Step 21: Estimate Development After Major Uncertainty Is Reduced
A development estimate is only as reliable as the assumptions behind it.
A one-line request such as “We need a customer portal with reporting” can only be priced roughly. A reviewed prototype with defined roles, workflow,
integrations and version-one scope can be estimated far more reliably.
Our guide to custom software development cost in Dallas covers what drives the final number.
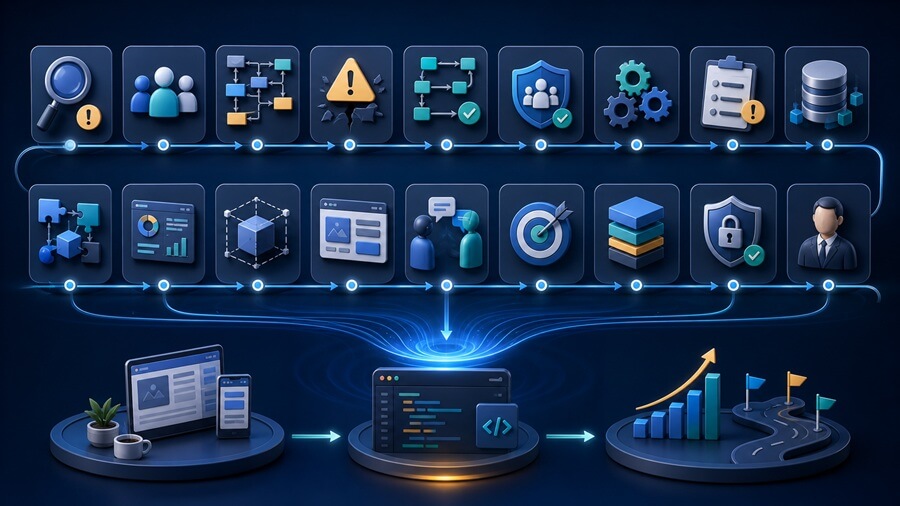
What Should You Have Before Coding Starts?
For a significant custom software project, you should ideally have clarity around:
- Business problem
- Users
- Current workflow
- Future workflow
- Core business rules
- User roles
- Permissions
- Data
- Integrations
- Reporting
- Version-one scope
- Prototype
- Success metrics
- Technical approach
- Product ownership
Not every detail needs to be finalized.
But the major decisions affecting architecture and workflow should not remain vague.
What You Do Not Need Before Development
Do not turn pre-development planning into analysis paralysis.
You do not need:
- Every future feature
- Every edge case for the next five years
- Complete requirements for every phase
- Every future integration
- Perfect design
- Final long-term roadmap
The goal is not perfect certainty.
It is enough clarity to build the right first version.
Discovery Should Reduce Uncertainty, Not Generate Documentation
A discovery phase can also go wrong.
The team may spend months creating:
- Huge requirements documents
- Process diagrams
- Specifications
without making meaningful product decisions.
The purpose of discovery is not documentation volume.
It is decision quality.
At the end, stakeholders should understand:
- What problem is being solved
- Who the users are
- How the workflow should operate
- What version one contains
- What the prototype looks like
- What the major risks are
- What the development roadmap is
If those remain unclear, discovery has not done its job.
Common Signs a Project Is Not Ready for Development
Development should probably not begin when:
- The target users are unclear.
- Leadership disagrees about the workflow.
- Nobody can define version one.
- Major integrations are unknown.
- User roles have not been defined.
- The team keeps adding features.
- Nobody owns product decisions.
- The business has never reviewed the workflow visually.
- Success cannot be measured.
Coding under these conditions may create visible progress.
It does not necessarily create useful progress.
Example: Replacing an Older Custom Application
Example: Building a SaaS Product
For SaaS, pre-development questions include:
- Who is the target user?
- Who is the buyer?
- What painful problem is being solved?
- What is the core workflow?
- What will users pay for?
- What needs to be validated?
- What can be manual initially?
The prototype validates the experience.
The MVP validates the product.
Skipping directly to full SaaS development increases the cost of being wrong.
How Argos Approaches Pre-Development Planning
Argos runs a short discovery and prototype phase before full development. We map the current and future workflow, define roles, integrations and version-one scope, and test clickable screens with real users, so the estimate and the build rest on a validated workflow.
Learn more about our custom software development services.
Planning a Custom B2B Portal?
Argos can help you map the workflow, define user roles and integrations, create a clickable prototype, and establish the right version-one scope before committing to a larger portal build.
Schedule a B2B Portal Development ConsultationFrequently Asked Questions
What is a vendor portal?
A vendor portal is a secure online application that allows suppliers, contractors, and service providers to complete onboarding, submit information, upload documents, track requirements, and interact with a business through structured workflows.
What features should a vendor portal include?
Common features include secure login, vendor profiles, onboarding checklists, document uploads, compliance tracking, expiration management, approvals, notifications, status visibility, reporting, and internal administration.
When does a business need a vendor portal?
A vendor portal may be useful when vendor onboarding, compliance documents, approvals, and status tracking are being managed through email, spreadsheets, shared folders, and repeated manual follow-up.
Can a vendor portal track expiring documents?
Yes. A portal can track expiration dates for documents such as insurance certificates or licenses and send reminders when replacements are required.
Should a vendor portal integrate with ERP or accounting software?
In many cases, yes. Integrations can reduce duplicate data entry and allow approved vendor records, payment status, or other information to move between systems.